Overview
In this page, we will walk through the process of integrating EasyLife 365's APIs with Power Automate. After completing the setup, users will be able to create Microsoft Teams or invite guest accounts directly from Power Automate workflows, automating governance tasks across Microsoft 365. This integration leverages custom connectors and API permissions to enhance cross-platform synchronization and resource provisioning.
For example, when a new client is added to the CRM, a Power Automate flow can automatically provision Microsoft Teams or SharePoint sites for collaboration, streamlining processes while maintaining governance and compliance standards.
By following this guide, you will be able to:
- Register an application in Microsoft Entra ID for use with Power Automate.
- Configure necessary API permissions for EasyLife 365.
- Create a custom Power Automate connector using OpenAPI files.
- Test the connector to ensure seamless functionality in creating Teams and managing guest accounts.
After successfully completing these steps, you can begin automating the creation of teams or inviting guest accounts via Power Automate, significantly improving your workflow efficiency.
Step 1: App Registration Setup
Follow these steps to create and configure an app registration in Microsoft Entra ID for Power Automate.
Create the App Registration
- In the Microsoft Entra admin center, go to the application registration page: App Registration.
- Click on Add New Application.
- On the Register an application page, enter the name of your application, select the appropriate Supported account types, and click Register.
Enable Public Client Flows
- Go to the Enterprise applications page, search for the application you registered in Step 1, and select the application.
- On the application page, go to Properties, then click on Application registration.
- Under the Authentication settings of the app registration, enable public client flows.
Add API Permissions
- Navigate to API permissions and, on the API Permissions page, click on the + Add a permission button.
- In the Request API permissions pane, go to the APIs my organization uses tab, search for
EasyLife 365, and add the permissionApp.ReadWrite.All. - After adding the permission esnure that you Grant admin consent for [Tenant Name]. You may have to wait a few minutes for this to take effect
Ensure the necessary permissions are granted for the API to function properly.
| Permission Type | Permissions (Scope) |
|---|---|
| Delegated (work or school account) | https://api.easylife365.cloud/collab/App.ReadWrite.All |
| Application | Not supported |
Create a Client Secret
In the Certificates & Secrets section, generate a new client secret and store it securely.
After setting up the flow in Power Automate, ensure that the redirect URI shown in Power Automate is added in Entra ID as well.
Step 2: Create the Power Automate Connector
You can use an OpenAPI file to create a new custom connector in Power Automate. Follow these steps for the configuration:
Create New Connector
-
Go to Power Automate.
-
In the main menu on the left, go to More > Discover All.
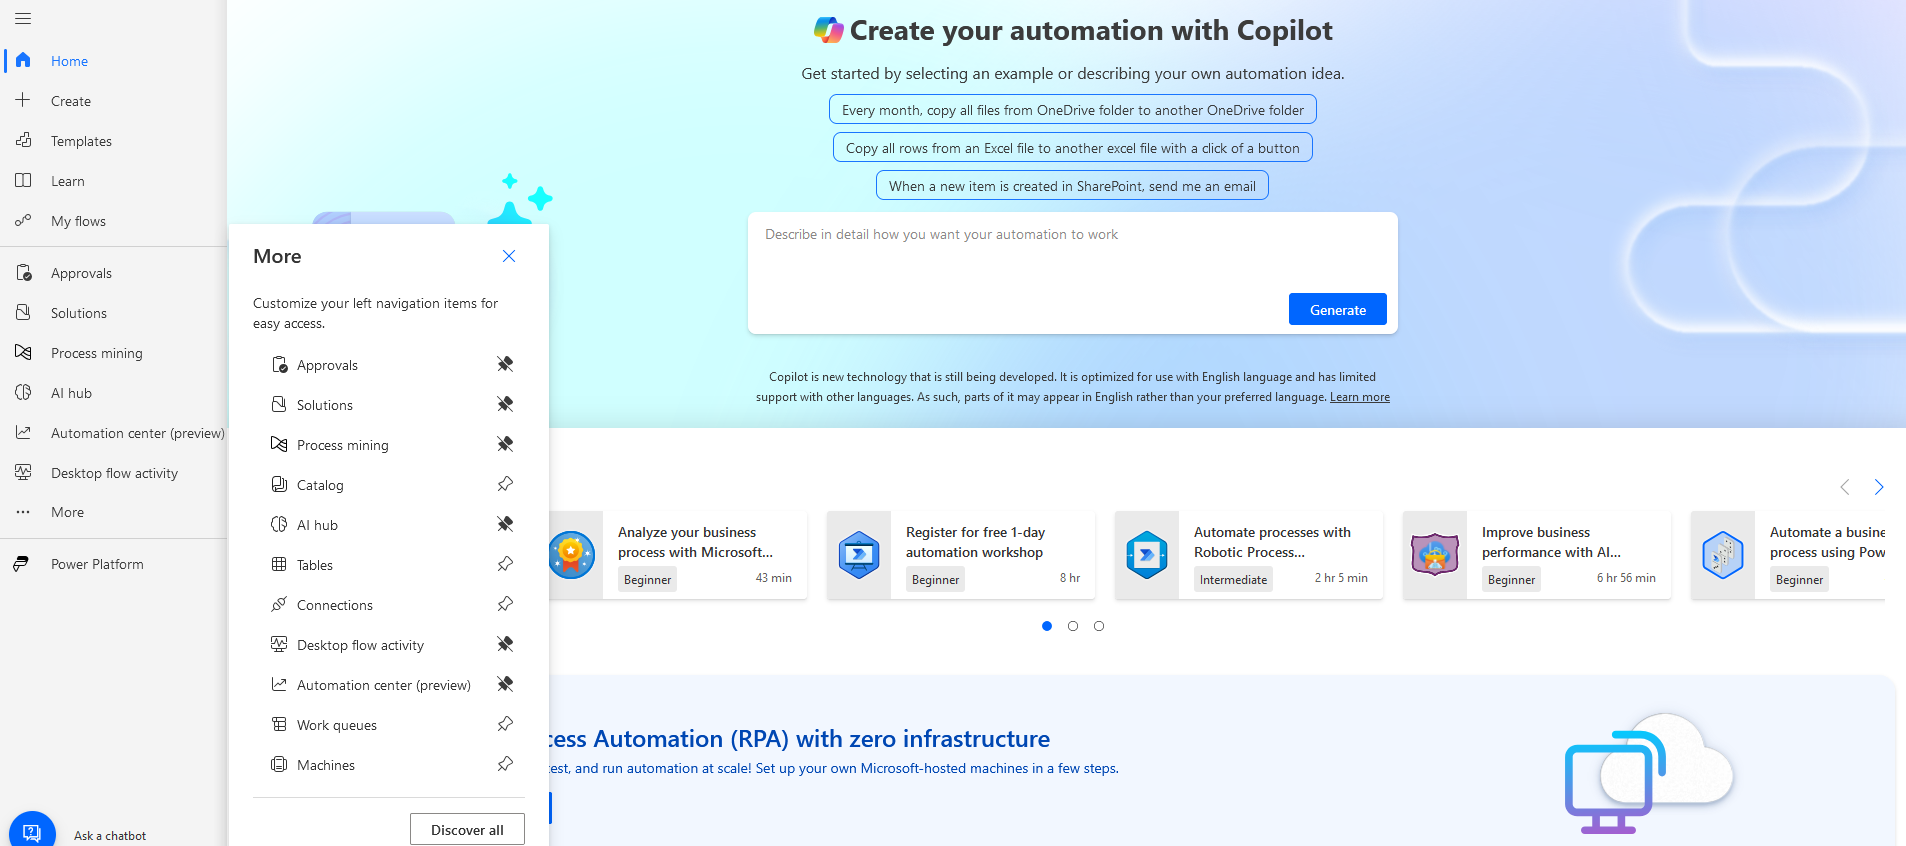
Power Automate Connections -
On the Discover all you can do with Power Automate page, go to the Data section, click on Custom connectors, then select + New custom connector > Import an OpenAPI file.
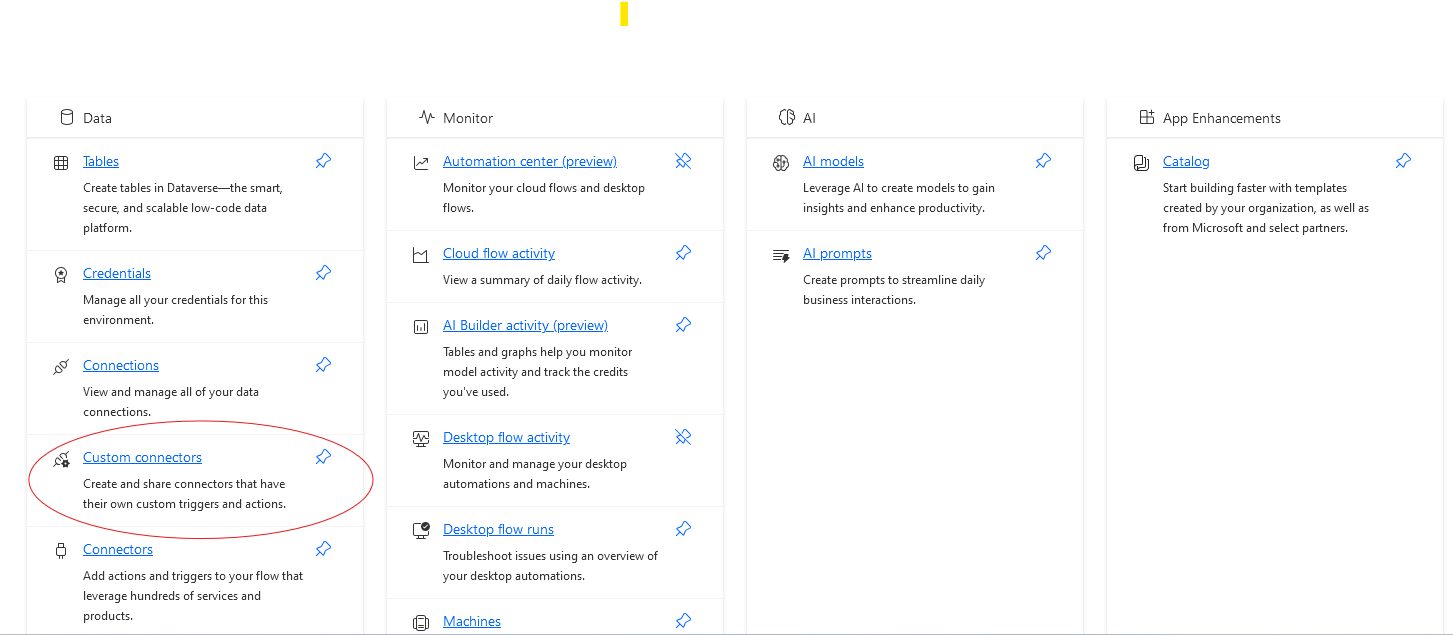
Power Automate Custom Connections 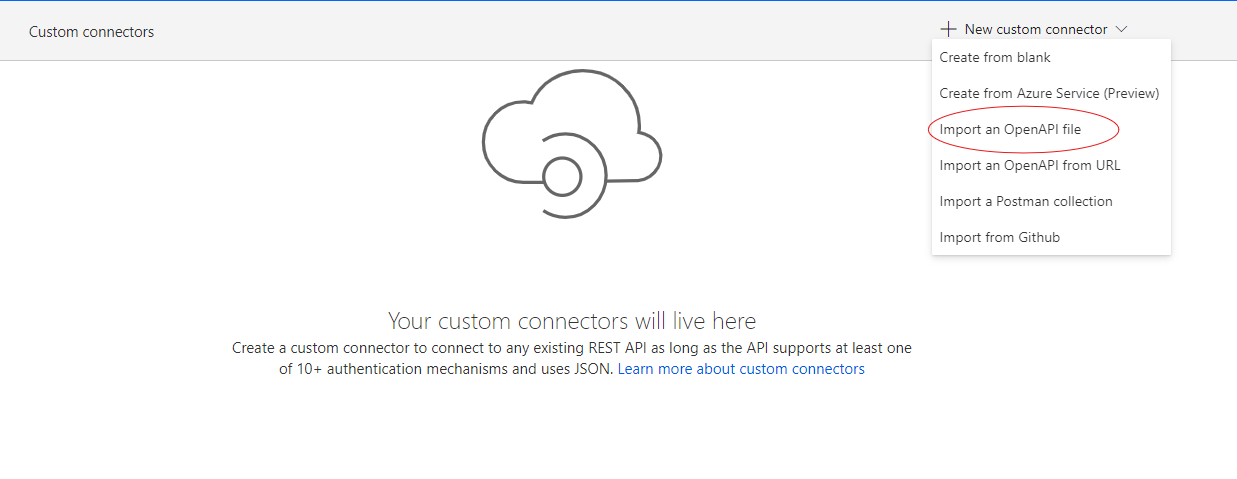
Power Automate Custom Connections Import API File -
In Power Automate, create a new custom connector from the OpenAPI file.
| API Area | Context | OpenAPI URL |
|---|---|---|
| Groups | User context (runs as signed-in user) | https://api.easylife365.cloud/collab/groups/api-docs/public.json |
| SharePoint | User context (runs as signed-in user) | https://api.easylife365.cloud/collab/spo/api-docs/public.json |
| Users | User context (runs as signed-in user) | https://api.easylife365.cloud/collab/users/api-docs/public.json |
| Admin Collaboration | Admin context (runs as administrator) | https://api.easylife365.cloud/admin/collab/api-docs/public.json |
Customize the Icon
-
After importing a valid file, the configuration page with the General information tab will load.
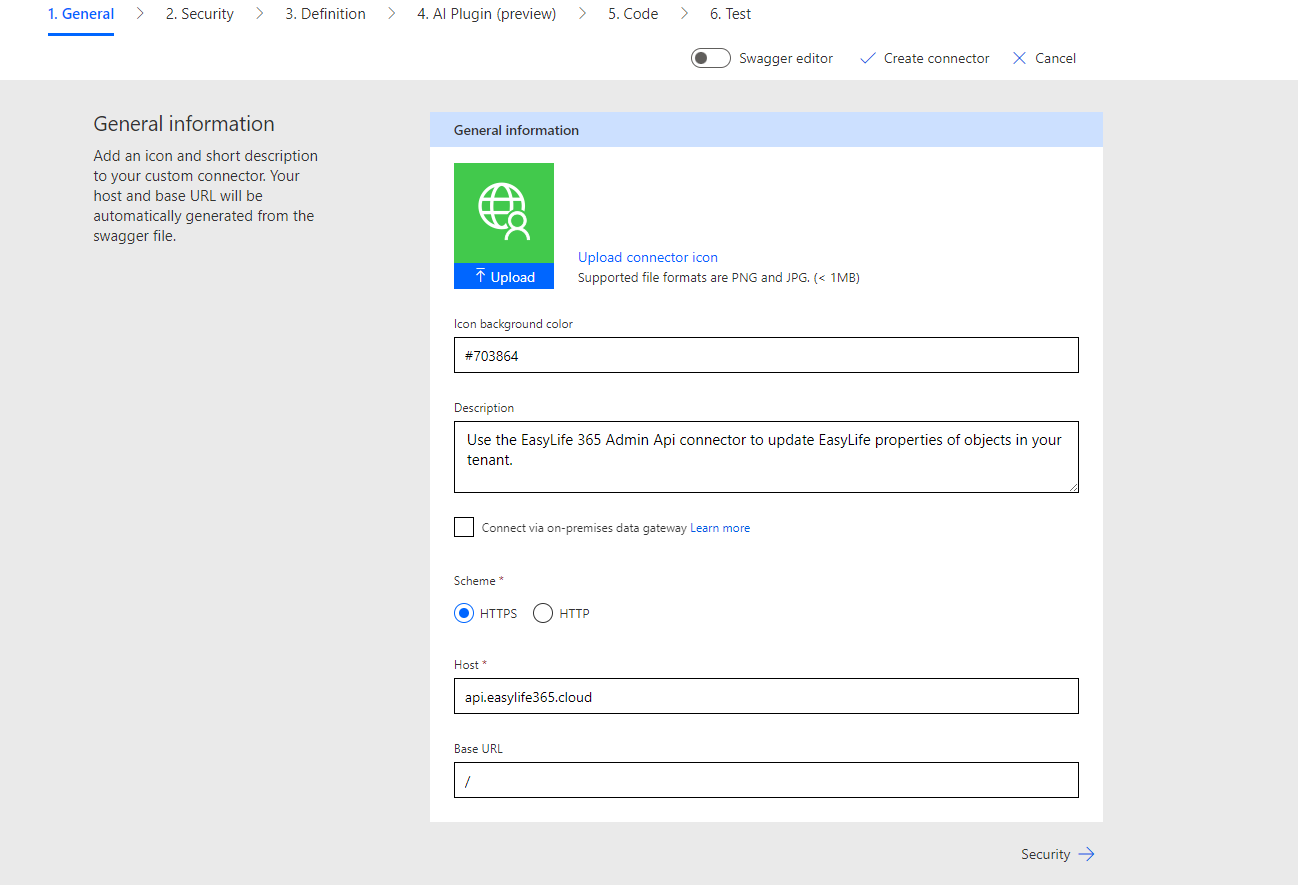
Power Automate Custom Connections General Information -
Set the icon background color to
#703864for visual consistency.
Configure Security Settings
-
Under the Security tab, select OAuth 2.0 and configure it for Azure Active Directory with the following parameters:
- Client ID: The client ID (application id) from the app registration created earlier.
- Client Secret: The client secret generated during the app registration.
- Resource URL: https://api.easylife365.cloud/collab/
- Tenant ID:
common. - Scope: https://api.easylife365.cloud/collab/App.ReadWrite.All
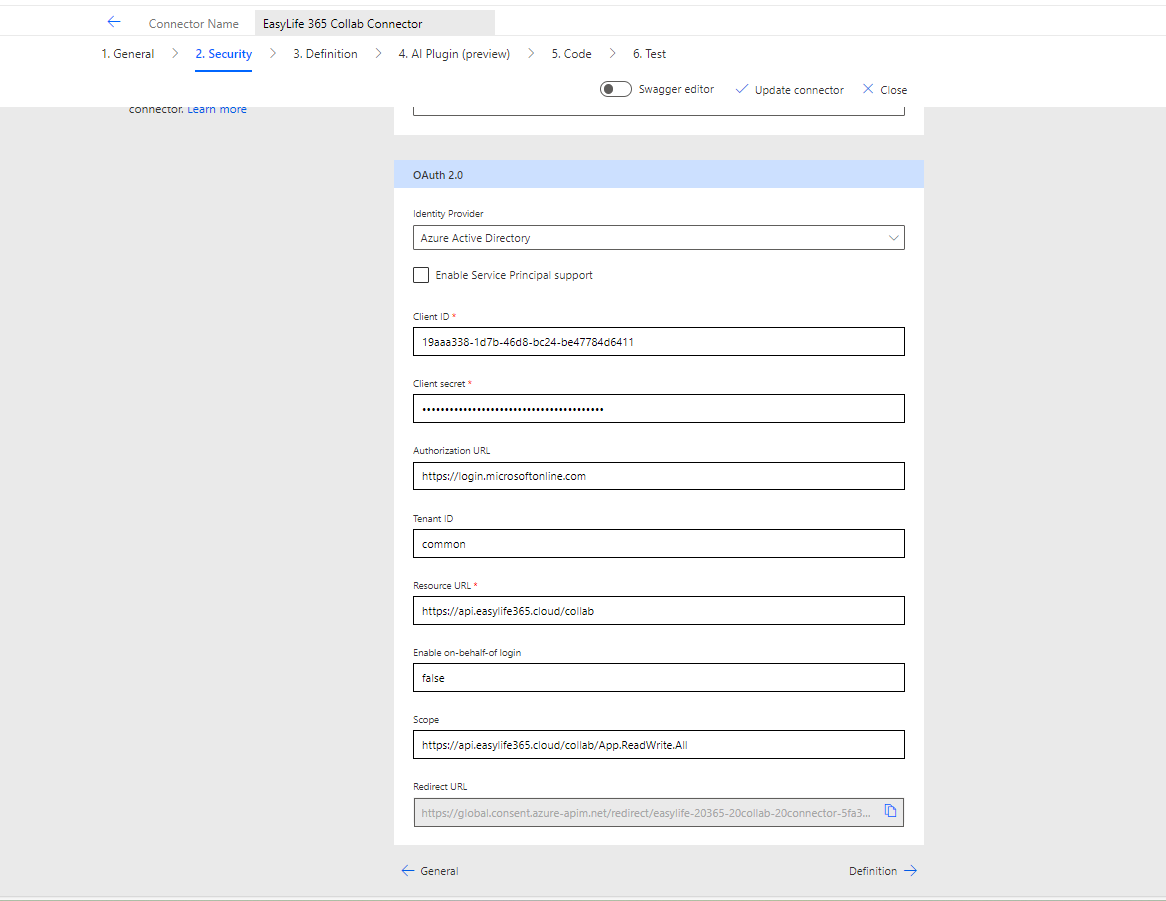
Power Automate Custom Connections Security Settings
Definition
- On the Definition tab, you will see summary information of the available endpoints in the imported file or API, showing the type of operation that is carried out by each endpoint (e.g., POST, PUT, GET, PATCH).
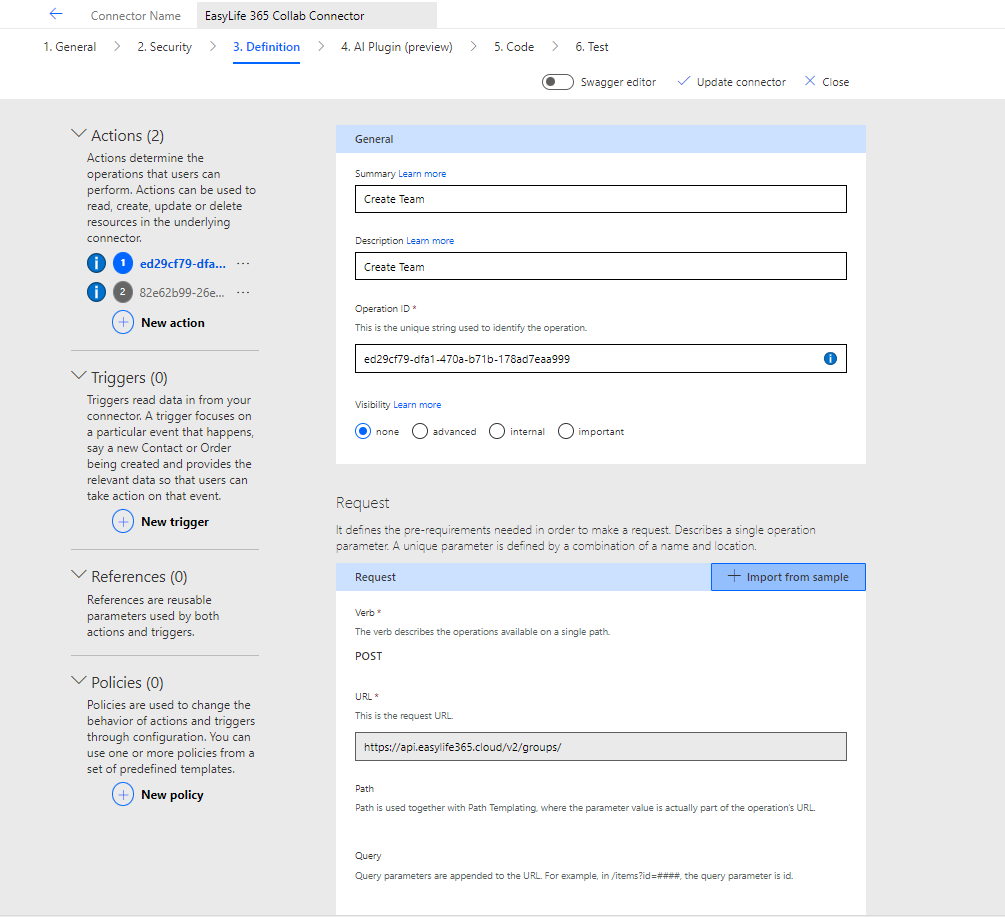
Create and Update Redirect URL
-
Once security configurations are done, click Create connector.
-
After creating the connector, go to the Redirect URL field (the last field in the Security tab) and copy the redirect URL.
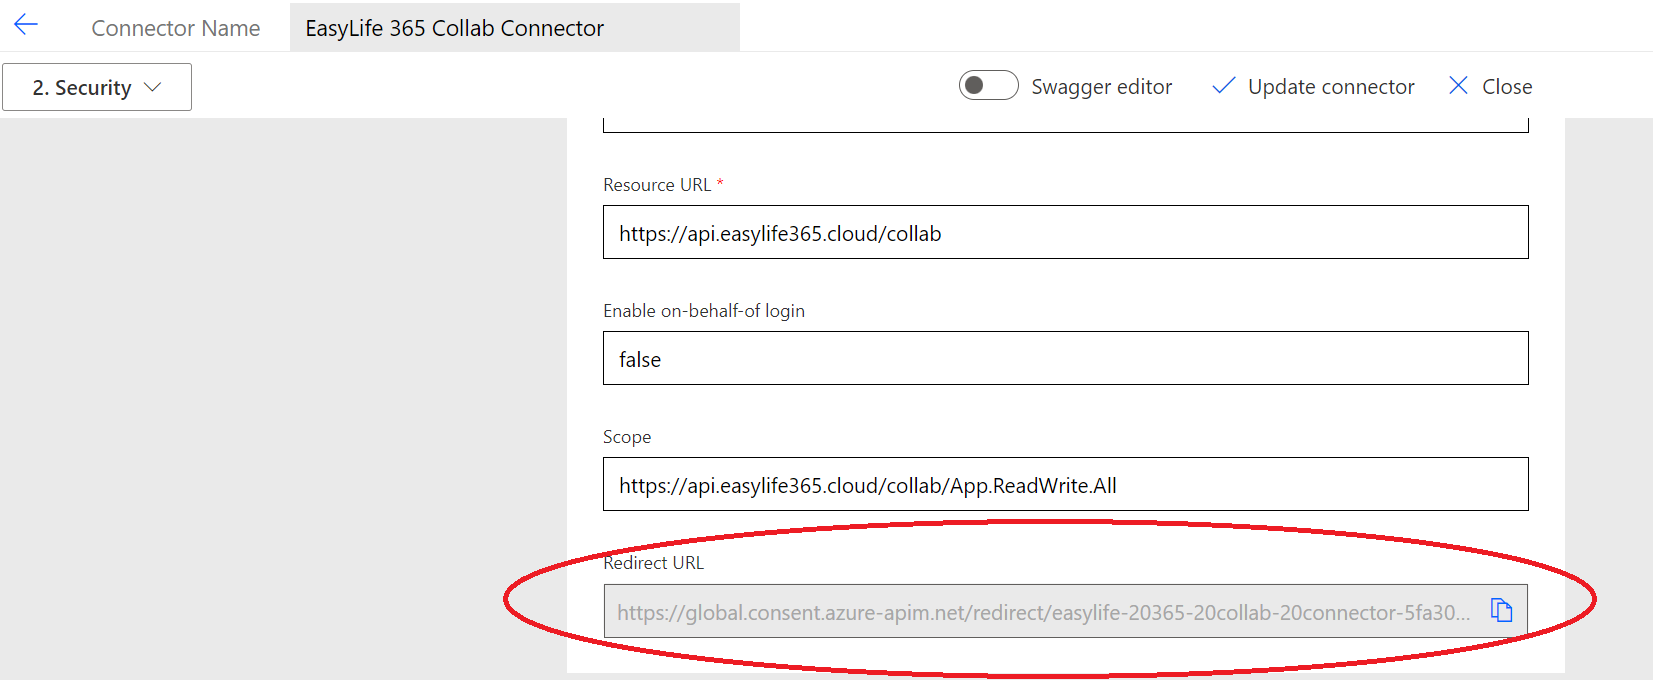
Power Automate Generated Redirect URL -
Return to the app registration in Microsoft Entra, go to the Enterprise applications page, search for the application you registered, and select it.
-
On the application page, go to Properties, then click on Application registration.
-
In the Authentication settings, under the Platform configurations section, click + Add a platform, and select Web.
-
In the Redirect URIs section, enter the redirect URL you copied earlier, then click Configure.
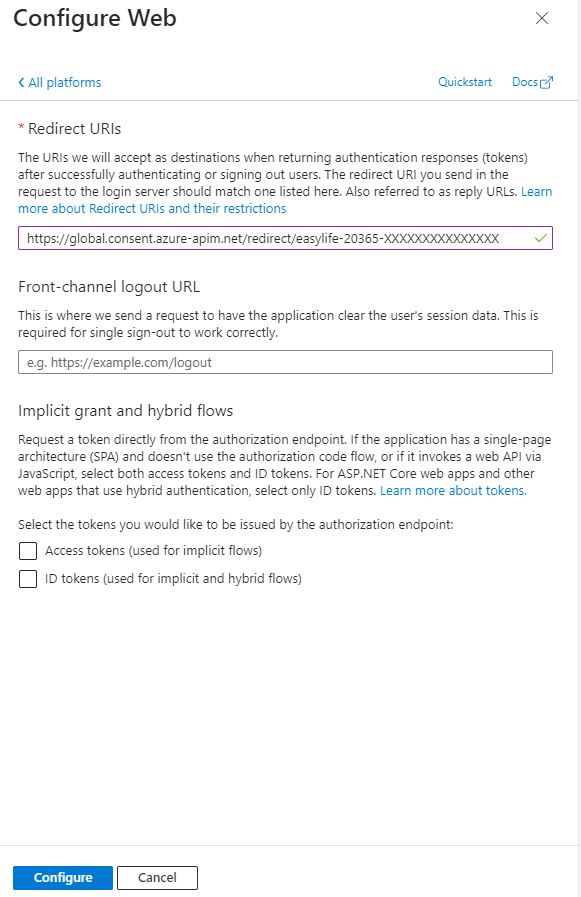
Power Automate Configure Redirect URL
Step 3: Testing the Custom Connector for EasyLife 365 Collaboration Product
This guide explains how to test the custom connector created for EasyLife 365 Collaboration. The test involves creating a new Microsoft Team using the connector, ensuring it is functioning as expected.
Before you begin, ensure that you have the following:
- Access to the EasyLife 365 Collaboration Admin Portal to retrieve the template ID.
- A valid user account with a Teams license that we will use to sign in to the connector.
Set Up the Connection
- Navigate to the Test tab in the connector interface.
- Under the Test Operation section, click on + New connection.
- This will open the Microsoft Power Automate Authentication page.
- Authenticate the account being used to create the custom connection.
- Once authentication is successful, the Selected connection field will display a valid connection.
In the Operations section, you will see parameter fields required for testing the operation. These fields correspond to the parameters needed by the API endpoint to provision the resources. You need to populate these fields based on your requirements and the expected input for the API.
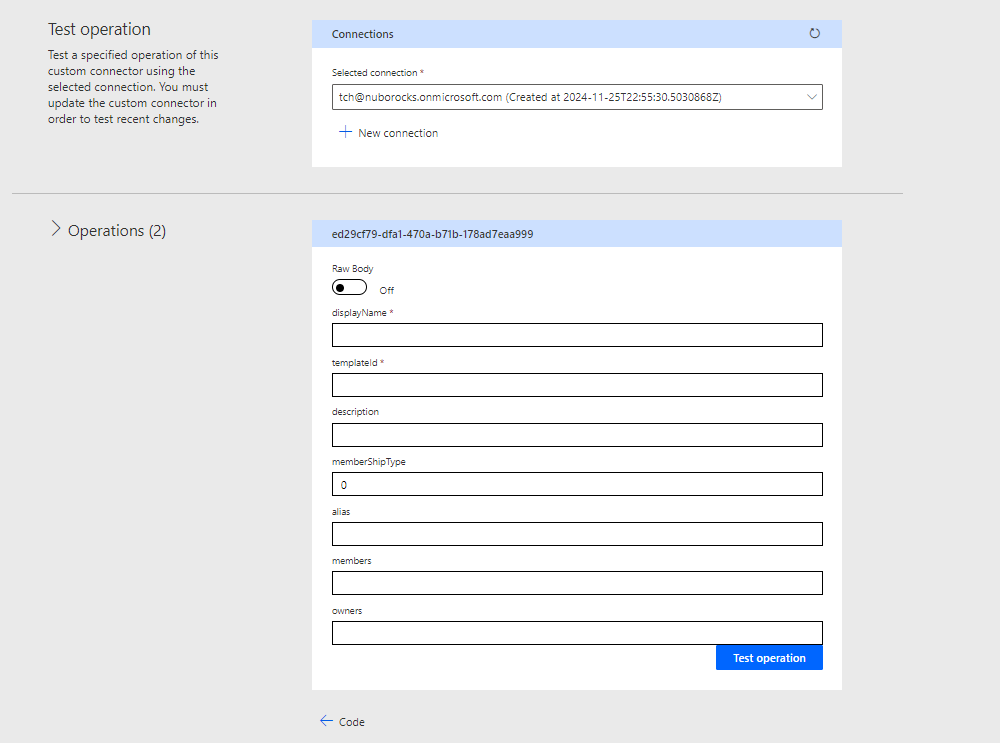 Figure 1: Power Automate Test Operation Interface
You can see the list of paramters filled out when testing the connector. These are based on the input required by the API endpoint. The required fields for creating a team are listed below.
| Field | Description | Example | Required | Type |
|---|---|---|---|---|
displayName | The display name of the Team. Any prefix or suffix defined in the selected template will automatically be added. | Marketing Team | Yes | String |
templateId | The unique identifier for the template. This can be retrieved from the EasyLife 365 Collaboration Admin Portal. If you do not have an existing template, create one in the portal. | c7a06b5e-3f3a-4a1b-9f7c-d1234567890a | Yes | String |
description | A short description of the Team's purpose or details. | Team responsible for managing marketing campaigns. | No | String |
memberShipType | Defines the privacy type of the Team. Possible values: 0 (Private), 1 (Public), 2 (Dynamic). The visibility and access of the Team depend on this field. | 0 | No | Integer |
alias | The mail nickname for the Team. Leave this field empty to use the alias defined in the template. | marketing-team | No | String |
members | A list of members to be added to the Team. Type: Array of strings (User IDs or email addresses). Default: Empty. | ["user1@example.com", "user2@example.com"] | No | Array of strings (User IDs or emails) |
owners | A list of owners for the Team. These users will have administrative privileges. Type: Array of strings (User IDs or email addresses). Default: Empty. | ["admin@example.com"] | No | Array of strings (User IDs or emails) |
- Click the Test operation button to verify the configuration.
The result will confirm whether the Team was successfully created or highlight any errors in the request.
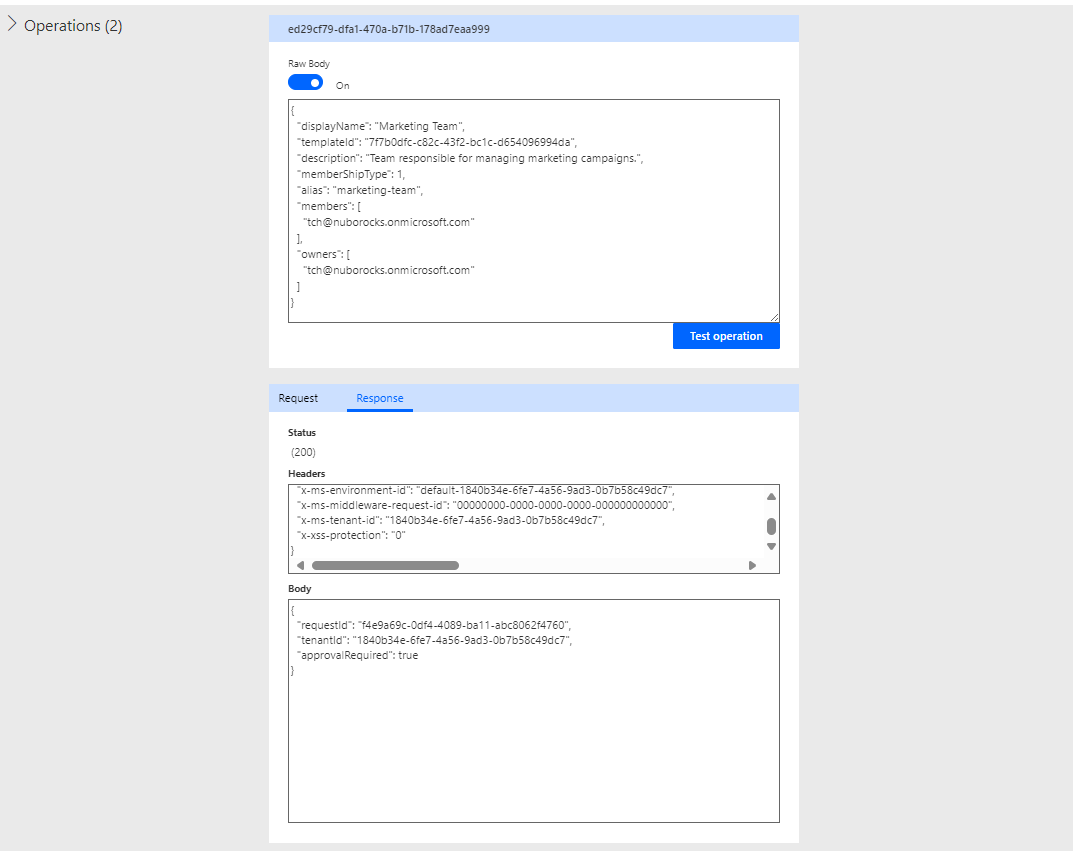 Figure 2: Successful Connector Test Result
To verify that the Team has been successfully created, check the following:
- The new Team should appear in the Microsoft Teams application.
- Verify that the correct members and owners are added to the Team.
- If the Team creation failed, review any error messages in the test result and troubleshoot accordingly.
Troubleshooting Connection setup
If you encounter the following error during the + New Connection process:
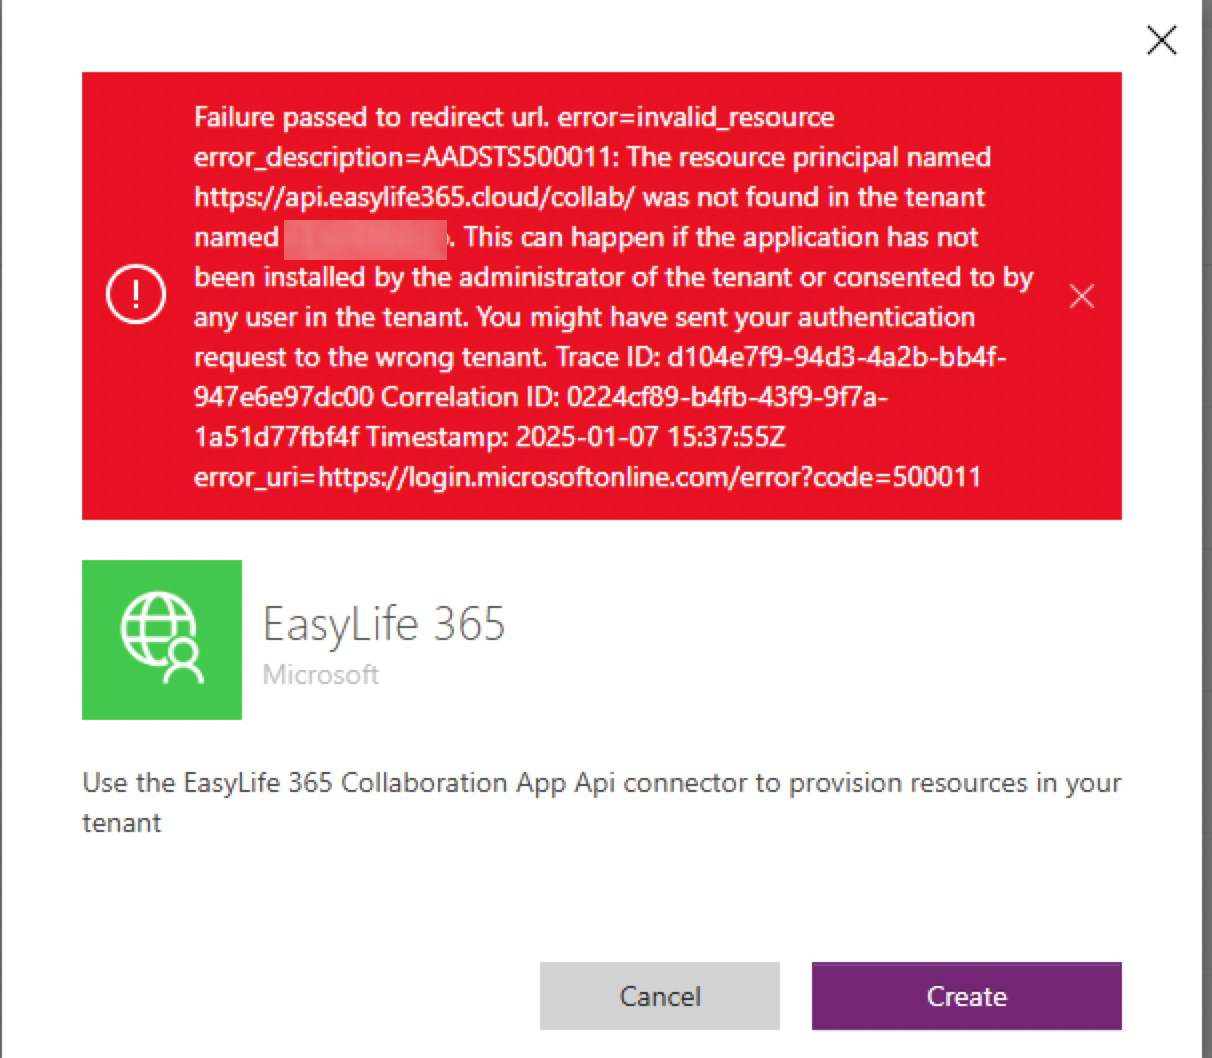
Follow these troubleshooting steps:
- Ensure that the correct Client ID and secret has been used and that the correct Redirect URL was used. Refer to Configure Security Settings
- Ensure that admin consent has been granted for the application you created in Step 1 by following instructions on Step 1 Add API Permissions.
- If admin consent has been granted and the issue persists, try reapplying the application permissions. To do this, go to EasyLife 365 admin portal EasyLife 365 Settings and repeat the procedure for granting EasyLife 365 permissions.